Intro
The Veiled Christ is an artwork commissioned to me by a marble company to be crafted in full-size marble. It is inspired by the famous sculpture of the same name by Giuseppe Sanmartino, completed in 1753 and located in the Cappella San Severo in Naples, Italy. When I accepted the project, I didn’t have a clear idea of how to approach it, but I was confident that with a strategic use of my 3D software tools, I would find a way. My biggest concern was the veil, and as it turned out, I was right, you will understand why.
Process
Before explaining how I created the Veiled Christ, it's important to note that the process involved the use of several software tools: Blender, ZBrush, 3D Coat, and Marvelous Designer.
For my professional needs, this combination is the ideal match, as I use each program in my workflow for specific purposes:
- Blender for setting up the project base and rendering.
- ZBrush for sculpting.
- 3D Coat for sculpting fine details, retopologizing, cleaning high-density meshes, and performing boolean operations between high-density meshes.
- Marvelous Designer for generating complex cloth simulations.
To keep things clear, I decided to focus on the overall process, explaining what was done with each software in chronological order.
I’ve grouped all the steps into five main phases, as illustrated in picture No.1:
- Blocking
- Modeling and Sculpting
- Building the Veil
- Refining the Veil
- Merging, Cleaning, and Retopologizing
Of course, the very first step is gathering references. For this project, I used photos and videos of the original statue available online.


Blocking
The blocking phase is where the base elements of the mattress, pillows, and body are created, as well as the positioning of the spine crown and the tools of passion. All of this takes place within Blender.
The bases for the mattress and pillows are modeled using basic polygonal techniques, while the body is constructed using my anatomy mannequin, Embryo.
Embryo consists of a collection of simplified anatomical elements that are linked together, allowing for easy transformation by moving, rotating, and scaling from key points. If you’re interested in learning more about Embryo, you can find additional information on my LinkedIn at this page.
Using Embryo, I established the proportions and pose of Jesus, creating the foundation for its sculpture.

Modeling and Sculpting
The modeling and sculpting phase is where most of the project, except for the veil, takes shape.
The instruments of passion were created entirely in Blender using polygonal modeling tools (picture No.4), while the spine crown was designed with curves, converted into polygons, and then sculpted in ZBrush (picture No.5).
The tops of the tassels were modeled polygonally, while the fibers were generated in Blender using the hair tool (picture No 6). These fibers were then exported to ZBrush for further adjustments and refinements (picture No.7).
The mannequin was also sent to ZBrush, where it was merged into a single mesh and sculpted.
A significant focus of this process was the study and detailing of veins. This began in Blender, where curves were drawn directly onto the final body sculpture (picture No.8). After being converted into meshes, the veins were merged with the body sculpture in ZBrush for additional refinement.


Building the Veil
With everything set, it was time to begin work on the veil.
Initially, I considered using a technique I had developed over the years for all my organic models, which I call the “Super Block Out.” This method involves blocking out a shape from the overall form to the finest details by adding 3D objects over existing ones using the IMM Brush in ZBrush. The IMM Brush is a versatile tool that allows for dragging and dropping meshes directly onto a surface.
An example of the Super Block Out technique can be seen in picture No.9, where the folds of a dress on a female figure are composed of numerous objects assembled to create the desired drapery effect.
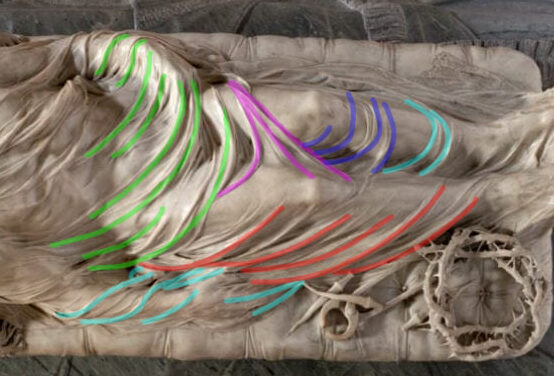
This technique is highly efficient for classic drapery artwork, which made me consider it as an option for the veil of the Veiled ChristRealizing this, I shifted my strategy to Marvelous Designer. Using Marvelous Designer, I could drape a large sheet over the body and let the simulation handle much of the work. While this seemed promising at first, it quickly became apparent that this approach was also not feasible. The foldings in the original artwork flow in multiple directions (picture No.10), and even though Marvelous Designer allows real-time adjustments, achieving the same intricate look as the original piece from a single sheet proved difficult.

Realizing this, I shifted my strategy to Marvelous Designer. Using Marvelous Designer, I could drape a large sheet over the body and let the simulation handle much of the work. While this seemed promising at first, it quickly became apparent that this approach was also not feasible. The foldings in the original artwork flow in multiple directions (picture No.10), and even though Marvelous Designer allows real-time adjustments, achieving the same intricate look as the original piece from a single sheet proved difficult.
Additionally, simulating a high-density mesh over the entire body posed its own challenges. High-density meshes lead to slow simulations, which reduce control and efficiency.
At this point, I decided to divide the veil into smaller sections. By focusing on one portion of the veil at a time, I was finally able to replicate the intricate flow of the original statue with precision. Anyway, further refinement was still needed.


Refining the Veil
The fourth phase took place back in ZBrush, where I worked with the newly created meshes of the veil, placing them over the rest of the model. At this stage, I began refining the flow to better match the original sculpture’s intricate design.
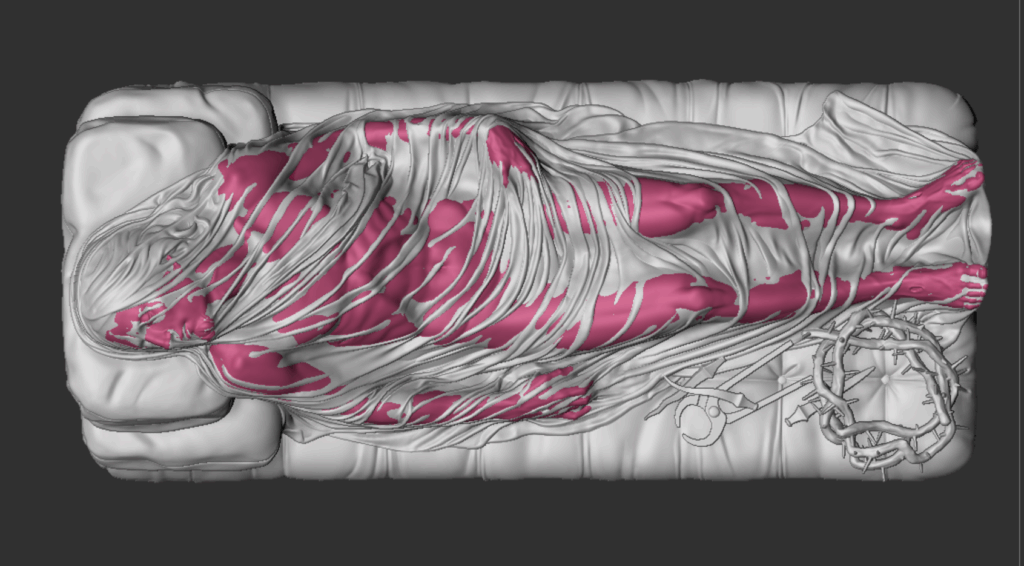
I wasn’t hesitant to adjust the veil objects, as the body beneath served as a guide to replace any close-fitting areas I modified. In picture No.14, the body is highlighted in pink, clearly showing the fitted sections of the veil.
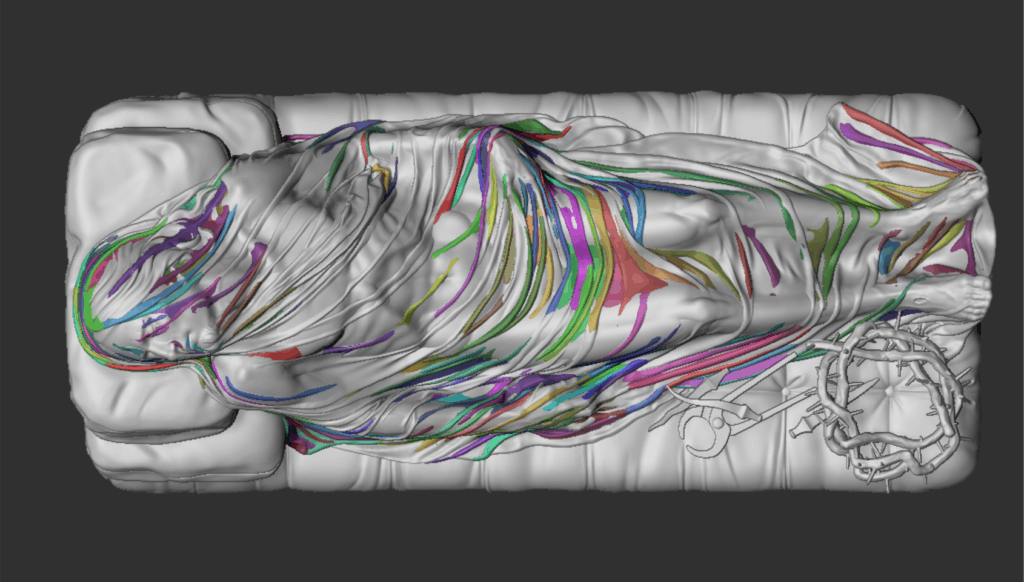
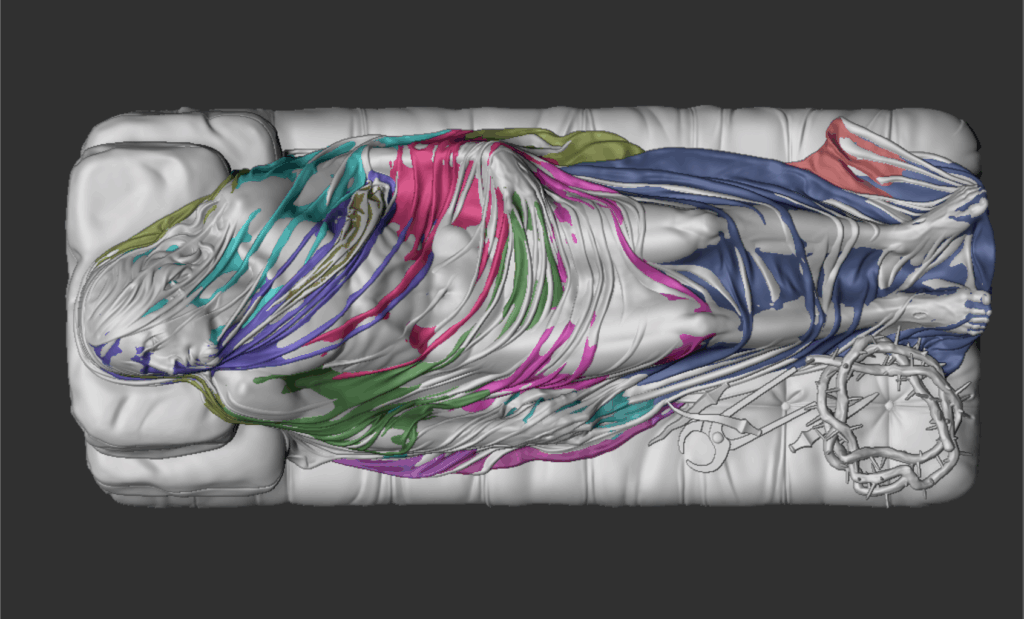
Using the Super Block Out technique, I added further complexity and refinement to the veil. Picture No.15 illustrates the additional elements created with this technique, while picture No.16 distinguishes the different portions of the veil by color, making the segmentation clear.
Merging, Cleaning, and Retopologizing
The fifth and final phase involved using 3D Coat. Before transitioning to 3D Coat, I needed to add thickness to the veil meshes (since they were initially open meshes) and fill all the gaps between the veil and body objects (see picture No.17).
3D Coat is a powerful 3D software that offers excellent voxel sculpting capabilities. When using voxels, the mesh must first be converted into a voxel object. This transformation changes the model from being surface-based (defined by faces) to a volumetric representation composed of digital particles known as voxels. This conversion gives the model a solid, full-body structure, akin to a real-life wax model. The voxel transformation unlocks new possibilities for editing, allowing advanced brush and boolean operations.
In 3D Coat, I merged all the veil and body objects into a single model and used voxel brushes to remove undercuts, fill gaps, and clean up the surface. This process prepared the object for retopology.
Retopology, or retopo, is crucial for two main reasons. First, it reduces the model's polycount, making it lightweight and efficient for rendering. Second, when done correctly, it ensures a smoother surface during subdivision. For this reason, the mattress, pillows, and veil were retopologized carefully by hand, capturing every detail with the appropriate edge flow (pictures No.18, No19 and No.20).
Picture No.21 shows the body and veil model before and after these steps.
This is how I created my Veiled Christ. The remaining tasks, such as lighting and material setup in Blender, fall outside the scope of this article and are subjects for another time.
This is how I created my Veiled Christ. The remaining tasks, such as lighting and material setup in Blender, fall outside the scope of this article and are subjects for another time.


Final Thoughts
In conclusion, I’m very pleased with the final outcome of this model, though I feel I could have refined the veil further by enhancing its contrast and volume. As it stands, the veil has a “fluid” appearance, which is a beautiful effect but differs from the original’s more rigid structure.
Ultimately, this project has been more of a research endeavor than a performance piece. I’ve learned a great deal from this experience, and that’s what truly matters.
My hope is that by reading this article, you can also benefit from my experiences and insights.